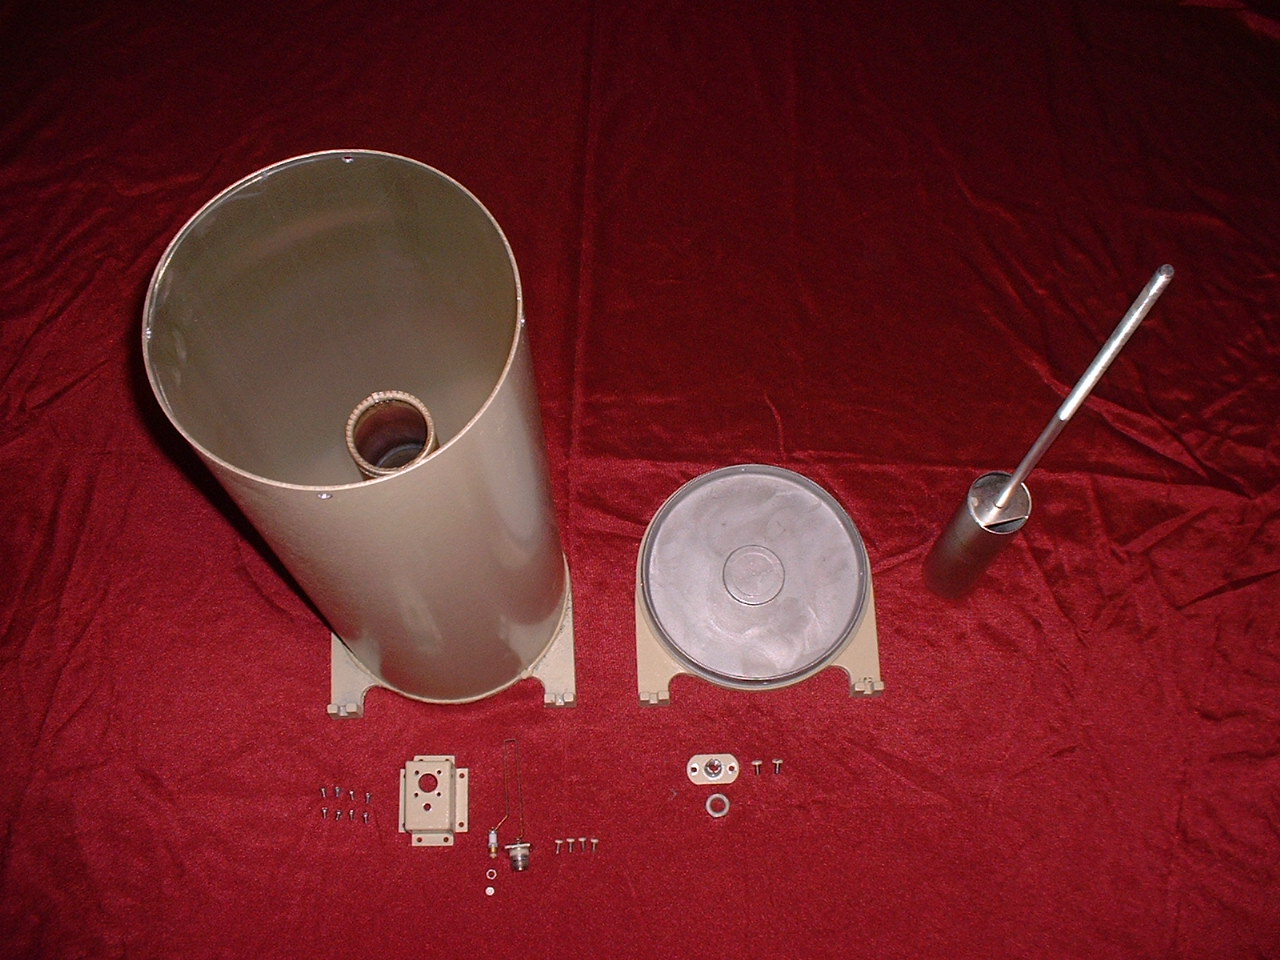
Cavity after disassembly (knob and springs not in photo)
Click on photo for larger version

Please note this is not a detailed "how to" article. It is missing a lot of photos that should have been included. No excuses... I just blew it during this project! I was so focused on completing the project and getting the duplexer back on the repeater I didn't take photos of everything!
The 2 meter duplexer, which once performed very well, had gradually become "noisy". If the transmitter was running more than a few watts, there were peroids of strong receiver desense. This noise generally had no special "signature", it was just wide band noise that raised the receive noise floor. It would fluctuate wildly from no noise to 20 dB or more. Any physical vibration of the duplexer would make it act up violently, with noise bursts as high as 40 to 50 dB! I had also noticed other changes in the duplexer. When it was tuned on our original 145.110 frequency in 1997, it made a scraping noise as the knobs were turned. This was due to the pressure of the finger stock on the tuning plunger. When I tuned it to our new 147.105 frequency in 2005, it felt different and did not make any noise as the knobs were turned. Clearly something wasn't right with it.
After the 2007 tower extension project I decided to take on the duplexer problem. I was very nervous about taking this thing apart, fearing I might do more harm than good. But it was well on its way to becoming unusable anyway. I hadn't been able to run high power for some time and it was even starting to have noisy periods with low power.
After removing the cable harness and unbolting all the cavities from the top and bottom support rails, the next step was to remove the minibox with the N connector and notch tuning capacitor from the top of each cavity. I then drilled out the four rivets which attach the bottom plate of the cavity. The cavity top plates are welded on and cannot be removed. Next came removal of the tuning rod and plunger from each cavity. The knobs have brass inserts and were soldedered to the rods! I loosend the lock nut on the tuning shaft and turned the knob counter-clockwise until the knob was at least five inches above the top plate of the cavity. With the lock nut re-tightened and the cavity lying on its side, I used a propane torch to heat the rod just below the knob until the solder melted and the knob could be unscrewed from the rod. I immediately tapped the knob sharply on a hard surface to get most of the excess solder out of the hole while it was still molten. I used a paintbrush to quickly brush any molten solder off the tuning rod. The threads inside the knob were then cleaned up using a "square ended" 3/8-24 tap. I cleaned up any solder remaining in the threads of the tuning shaft by running a die onto it. I did this by hand only (not using a handle on the die) in order to be sure I didn't accidentally damage the threads. I then loosened the lock nut, removed the two screws holding the rod lock assembly to the top of the cavity, and unscrewed the entire lock assembly from the rod. With the rod now free and clear, I reached into the open bottom of the cavity, grasped the end of the tuning plunger, and pulled it out the bottom of the cavity (being careful to pull it straight so as not to risk damaging the finger stock). There is a coil spring (actually two springs joined end to end) which runs around the outidse of the finger stock to increase the pressure of the fingers on the moving plunger. Using two angled needle noise pliers I was able to grasp the ends of the springs and unhook them for removal.
Cavity after disassembly (knob and springs not in photo)
Click on photo for larger version
I was somewhat disappointed with the construction quality of the cavities, especially given what these things cost. The holes for the bottom plate rivets were evidently drilled by hand and somewhat randomly it seems. They were not evenly spaced around the circumference of each cavity, nor were they a fixed distance from the bottom. Some were drilled too high, causing the drill to cut a notch in the top edge of the lip on the bottom plate instead of making a hole through it. There were solder "runs" inside the fixed center portion of some cavities from soldering of the finter stock. Some had blobs of solder so large they forced the tuning plunger off center, making for uneven contact with the finger stock. I don't know if this is a potential issue or not, but I was surprised at the construction where the rod exits the top of the plunger. The hole cut in the plunger top plate is about .010" larger than the rod and there is no insulated bushing in the hole. In most other duplexers I have seen, there is an insulated bushing there which prevents loose electrical contact. I would have liked to enlarge the hole and insert a teflon shoulder bushing there, but since the rod is silver soldered or brazed to the bottom of the plunger, it was not possible ro remove it to drill out the top hole. Before reassembly, I did mange to get a strip of .010" teflon sheet into that gap. The teflon extends all the way around the rod where it goes through the plunger top plate. I don't know if this makes any difference in performance, but I feel better with this point insulated.
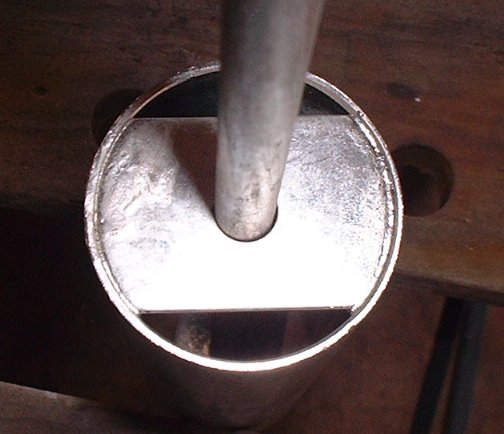
Top of plunger before insertion of teflon sheet around rod
One reason for unstable performance became obvious during disassembly. The plungers had been lightly coated with some (gel?) substance, I guess to provide lubrication? This stuff had deteriorated into a stubborn semi-hard coating on the plungers. [Note: I later learned the product is called Rheolube 362]. It was such that when the cavities were tuned, the fingers tended to ride on top of this 'goo' and not touch the plunger! I found this stuff could be mostly removed, albeit with considerable effort, by using a rag wetted with 99% isopropyl alcohol. Even so it left remnants behind which made the plungers appear dull and feel somewhat rough to the touch. I thoroughly cleaned and polished the plungers using 000 grade synthetic steel wool. I do not recommend using regular (metal) steel wool. It took some time to get them shiny and smooth. I also cleaned the threads of the tuning rods with synthetic steel wool. This is even more time consuming if you are like me and unwilling to settle for anything that doesn't appear to be 100% clean. The finger stock and the springs that go around it were also thoroughly cleaned using a rag soaked in isopropyl alcohol followed by a lot of gentle buffing with the synthetic steel wool.
Next I removed the tuning loop, N connector, capacitor assembly from the minibox. All mating metal surfaces were thoroughly cleaned up using small strips of 360 grit sanding sponge. This includes the flanges of the minibox where it touches the top of the cavity and the inside of the minibox where the N connector and capacitor touch it. I also cleaned the top of the cavity where the minibox makes contact with it and where the rod locking assembly attaches to the cavity top. The bottom of the lock plate assembly was cleaned as well.
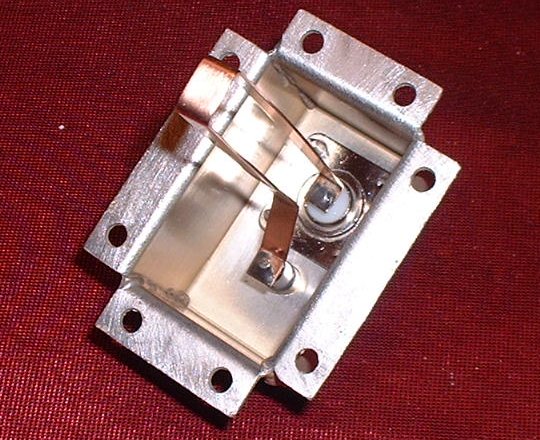
A refurbished loop and connector assembly
Although perhaps not necessary I also cleaned the loops themselves. They were stained and ugly from solder flux that had not been cleaned off after manufacture. Some considerable time and care with small strips of 360 grit sanding sponge resulted in loops that were smooth and shiny. I then rubbed them with Nevr-Dull wadding metal polish and removed any visible residue from this process with a paper towel. I was very careful not to touch the loops with my fingers during or after this process. Again this is probably overkill but if I am going to refurbish something I'm gonig to get it as good as I can.
I cleaned up some tarnish from the outside bottom end of the fixed portion of the cavity center with synthetic steel wool, being extremely careful not to damage the finger stock. The entire inside of each cavity was wiped clean of any dust, etc. using a rag with isopropyl alcohol.
At the time I was unable to come up with any information as to what the substance used to coat the plungers and finger stock was, or why it had been used. [It is Rheolube 362, a conductive lubricant]. I am not sure my decision was appropriate, but I elected to very lightly coat these surfaces with Dow Corning Number 4 compound at the time of reassembly.
The inside of all male and female N connectors was cleaned with swabs dipped in isopropyl alcohol.
While the cavites were apart, and before cleaning, I had drilled out the rivet holes in the cavity outer wall to pass a #12-24 machine screw, and tapped the holes in the lip of the bottom plate for 12-24 screws. Rivets would have been fine for reassebly, but as I have no talent for installing them (I know, it should be simple!) I used stainless steel machine screws instead.
Assembly was the reverse of disassembly. After puttig the springs back in place around the fingers, and applying Dow Corning Number 4 compount to the finger stock and plunger, the plunger was pushed back into place. The shaft lock assembly was threaded onto the rod and secured to the cavity top plate with its two screws. The loop assembly was re-installed in the minibox, which in turn was screwed in place on top of the cavity. Lastly the cavity bottom plate was secured with the SS 12-24 screws. For re-attaching the knobs, I used a chrome plated hex nut screwed onto the rod with a SS split washer on top of the nut. After screwing the knob onto the shaft as far as it would go, I grasped the knob firmly with one hand while tightening the nut and washer against the bottom of the knob with a wrench. The cavities were bolted to the top and bottom rails and finally the cable harness re-installed.
The cavites now felt and sounded as they had many years earlier when the knobs were rotated. But the real proof was in performance. I had carefully tuned the duplexer and measured the peformance prior to disassembly. The notch depth on one side was 100 dB; the other side 113 dB. The notches would fluctuate with any vibration, especially tapping on the knobs. After cleaning, notches were in excess of 120 dB on both sides (wow!) and very stable. At the time of writing this article, the duplexer has been in service six months since being refurbished. The repeater has been running high power during this six month period with no problems.
Last update March 20, 2012